How to Convert a Physical Win2003 Server to a VirtualBox Equivalent
WARNING: do not bother doing this if you have an OEM license on the physical server because you will not be able to get in to the virtual machine because you will not be able to activate the license unless you are running with the original motherboard. Further details on OEM licenses are here. Of course if you want to purchase a new Product Key from Microsoft, you can do the conversion and then phone up and try purchasing a license for the virtual clone of your machine.
VMConverter does the most amazing part of this work: it converts the physical Windows 2003 Server OS partition to a virtual format while Windows is running, conveniently excluding the pagefile and hibernation file, and offering many other useful features. I read about it here and downloaded the free utility from VMWare here.
You have to install it before you can run it. I ran it in Standalone mode because I wanted to write the VMDK to a local disk which was not c:\ with c:\Windows. If you want to convert the entire machine at once, I guess you have to use Client Server mode.
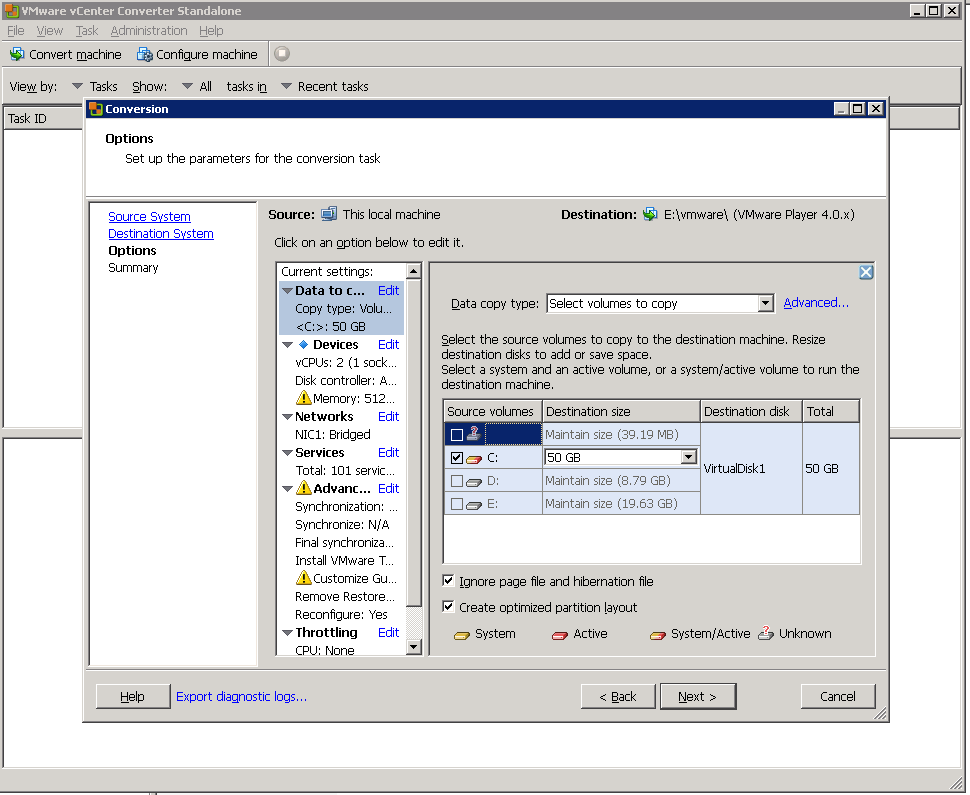
I made the VMDK suitable for use with the highest vesrion number of VMWare Player because that seemed (to me) to be the most likely to fly.
Select Destination Type: VMWare Workstation or Other VMWare Virtual Machine
Select VMWare Product: VMWare Player 4.0.x
I recommend reviewing all the settings for the conversion, especially those on this tab:

The output from VMConverter is a VMDK file plus a second tiny VMX file that is very meaningful to VMWare.
This step required more than 1 hour to run.
I transferred the files to the separate host computer via ftp. But keep reading because this not pan out so you should not bother...
In VirtualBox, I tried creating a new machine and using just the VMDK as its first (boot) disk on IDE. That booted to a screen but not to Windows. Once I saw it boot and show the choice of Windows boot but only for a second and never again. In any case that did not give a useful conversion.
Then I tried a second free tool from VMWare, their OVF Tool. Read OVF Docs Here and Get to OVFTool Download You have to install it before you can run it.
The OVFTool.exe program takes the output from the prior step and creates the 3 files that together represent the virtual machine in a way that Virtualbox can import.
I created a subdirectory named OVF beneath the output from the prior step. I opened a CMD prompt in the folder with the VMX file.
d:\Apps\VMWare\OVFUtil\ovftool.exe abc.vmx ovf\abc.ovfThis step required more than 1 hour to run.
Transfer the resulting 3 files to the host (where the VirtualBox Manager program is). Then import the so-called appliance OVF into VirtualBox.
For the non-OS partition(s), I used 7Zip to archive the files and transfered the 7Z file(s) to the already running virtual machine, and then restored it all one to a new separate virtual dynamic drive, making the maximum size larger at the same time to avoid extra work in future years.
Note that you have to run Control Panel > Administrator > Manage Computer > Disk Manager in order to first recognize and then format a new empty virtual disk. Then you can start writing to it normally from Windows.
Windows has to be activated within 3 days of first boot within VirtualBox Manager.
